 Skip to Navigation
Laravel is a common choice when it comes to PHP frameworks. This is largely due to its simplicity and the availability of in-depth documentation and tutorials. Still, even with so much information on hand, confusion and questions arise regarding how to test and send email with Laravel.
In this article, we try to clear up that confusion and answer the most common questions.
We also give you an overview of the popular framework and how to use it in combination with end-to-end sending solutions.
If this sounds like the piece of content you were looking for, then keep on reading!
What is Laravel, and how does it work?
Laravel is a framework with an expressive and elegant syntax.
It offers features such as thorough dependency injection, an expressive database abstraction layer, queues, and scheduled jobs, unit and integration testing, and more, thus facilitating an “amazing” experience for those using it to develop modern, full-stack web applications.
The creators of the framework call it incredibly scalable and claim that it is capable of handling enterprise workloads. They also say it’s a progressive framework as it grows with the developer, be it a junior or senior one.
Laravel versions
Major releases of the Laravel framework happen yearly around February, while minor and patch releases, which do not contain breaking changes, happen frequently, sometimes even on a weekly basis.
Each major release receives bug fixes for 18 months and security fixes for 2 years.
| Version | Release | Bug Fixes Until | Security Fixes Until |
| 6 (LTS) | September 3rd, 2019 | January 25th, 2022 | September 6th, 2022 |
| 7 | March 3rd, 2020 | October 6th, 2020 | March 3rd, 2021 |
| 8 | September 8th, 2020 | July 26th, 2022 | January 24th, 2023 |
| 9 | February 8th, 2022 | August 8th, 2023 | February 8th, 2024 |
| 10 | February 7th, 2023 | August 7th, 2024 | February 7th, 2025 |
Source: https://laravel.com/docs/master/releases
The two latest versions of Laravel, version 9 and 10, offer many robust features.
Laravel 9 builds on the improvements made in Laravel 8.x and introduces bug fixes, usability enhancements, support for Symfony 6.0 components, Symfony Mailer, Flysystem 3.0, improved route:list output, a Laravel Scout database driver, new Eloquent accessor/mutator syntax, and implicit route bindings via Enums.
Laravel 10 includes a minimum PHP v8.1 version, a new Laravel Pennant package, invokable validation rules, native type declarations, and more.
Note: Our recommendation is to choose a newer version of a framework for better performance that aligns with industry standards if your project server supports its setup.
Laravel email services
Laravel has its own email services, which enable sending emails through local or cloud-based services.
The sending is done with a simple email API powered by the Symfony Mailer component.
The Laravel and Symfony Mailer combination gives users a range of drivers they can use to send email via SMTP, third-party email-sending services, and the Sendmail MTA.
Laravel’s email services enjoy quite a lot of popularity, and that is largely due to the features they provide, which include:
- Queueing emails.
- Creating regular plain text and HTML email messages.
- Attaching files in different formats and MIME types, as well as raw data.
- Including inline attachments and embedding raw data into email templates.
- Previewing messages in-browser.
- Markdown support (in quite a few frameworks) – create beautiful templates and easily include buttons, tables, or panels.
- Templating system – use various templates and configure views.
- Localization methods – set the desired language for a specific user.
- Local development mailing – prevent sending test emails to real inboxes.
Before sending emails in Laravel
Although sending emails in Laravel isn’t too difficult of a task, before starting the process, it’s important that you are familiar with the following basics.
Configuration
The configuration of Laravel email services is done in the config/mail.php file. Within this mail configuration file, there is a mailers configuration array containing a sample configuration entry for each of the major mail drivers/transports supported by Laravel.
The default configuration value in this file is what determines which mailer will be used by default when sending an email from your Laravel application.
Thanks to all of the mailers configured in the config/mail.php file, you can use different email-sending services for different types of emails.
Generating and writing mailables
In Laravel, different types of emails are represented by a “mailable” class stored in the app/Mail directory.
By default, this directory is not present in your application. Instead, it’s generated upon the creation of the first mailable class.
To create a mailable class, you need to use the following command of the Artisan CLI (included in Laravel):
php artisan make:mail MailableNameOnce created, the contents of the mailable class can be seen, and the class itself can be configured using the following methods:
- Envelope – Returns the Illuminate\Mail\Mailables\Envelope object, which defines the subject and the recipients.
- Content – Returns the Illuminate\Mail\Mailables\Content object, which defines the Blade template used to generate message content.
- Attachments – Returns an array of attachments.
Sender configuration
To specify the sender, or, in other words, the “from” email address and name, you can use the message Envelope object or a global “from” address.
- Specifying the sender in the Envelope object:
use Illuminate\Mail\Mailables\Address;
use Illuminate\Mail\Mailables\Envelope;

/**
* Get the message envelope.
*
* @return \Illuminate\Mail\Mailables\Envelope
*/
public function envelope()
{
   return new Envelope(
       from: new Address('example@example.com', 'Test Sender'),
       subject: 'Test Email',
   );
}- Specifying the sender in
config/mail.phpusing a global “from” address:
'from' => ['address' => 'example@example.com', 'name' => 'App Name']Note: The global “from” address should be used if the same “from” address is to be used in all of the emails sent by your application. This is very convenient as it prevents you from having to call the from method in each of your mailable classes and serves as the default “from” address if no other is specified.
Sending emails in Laravel
The most common ways of sending emails in Laravel are using SMTP and using email API. We will now go through both in detail, as well as how to turn your emails into HTML ones, include attachments, and send to multiple recipients, essentially covering all one might be curious about when starting off with Laravel email sending.
How to send email in Laravel using SMTP?
The first step of sending using SMTP is inserting your SMTP mail server credentials into the .env file of your application.
We will be using the credentials provided to us by Mailtrap’s sending solution – Mailtrap Email Sending – as it is reliable and also offers high deliverability rates by design.
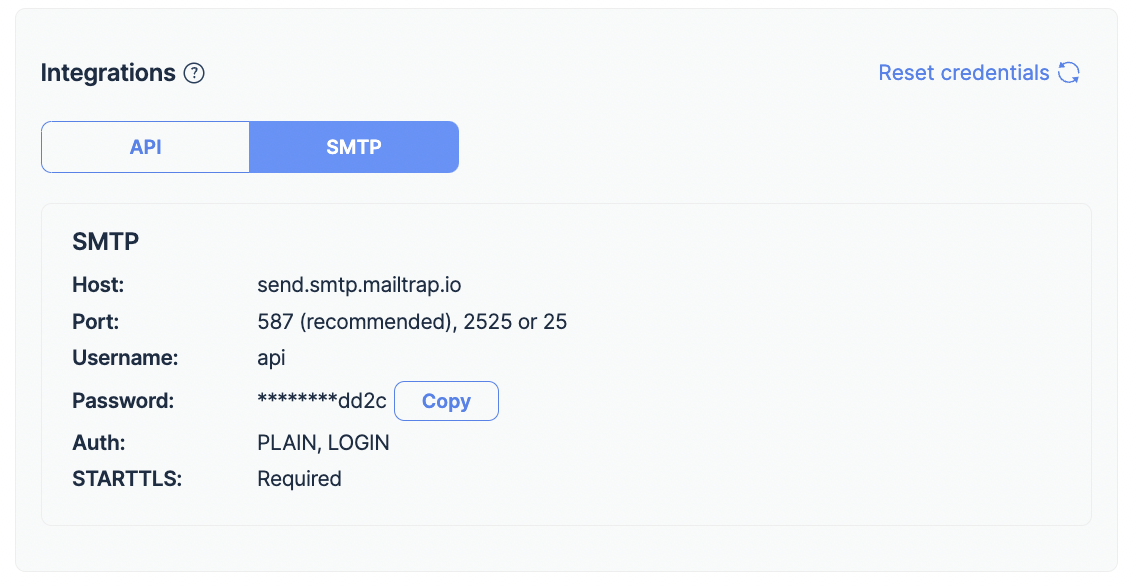
To find the credentials, you first need to create a Mailtrap account and log in.
Then, in your account, under Email Sending, navigate to Sending Domains, where you need to add and verify your domain.
The process is described in detail in the video below:
Upon domain verification, you will be taken to the API and SMTP page, from where you can copy the SMTP credentials you need to paste into your app, project, or email sending service.
If you don’t have an existing Laravel application, the next few paragraphs will show you how to create it.
Run either the laravel new mailtrap_email_in_laravel or the composer create-project laravel/mailtrap_email_in_laravel (mailtrap_email_in_laravel should be replaced with the name of your application) command in the terminal to create a new project.
After that, use the cd mailtrap_email_in_laravel command to change the directory to mailtrap_email_in_laravel (should match your directory name). This is necessary in order to run the Laravel command for creating the mailable classes.
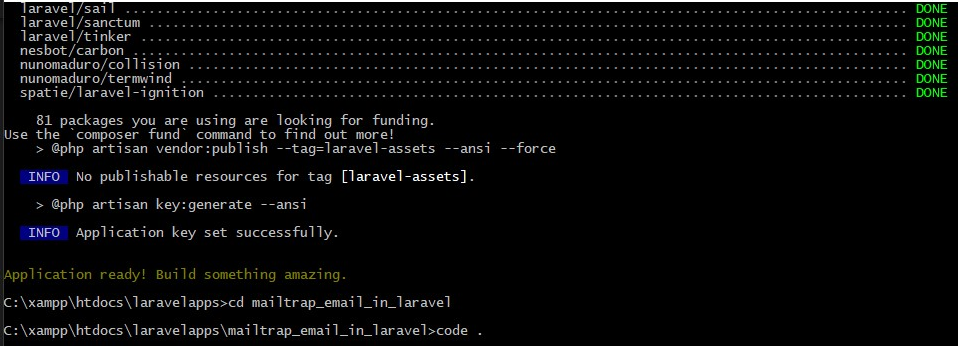
Finally, to view your Laravel application in a browser, run the php artisan serve command.

With your Laravel application created and running, we can go back to inserting the Mailtrap SMTP mail server credentials.
This is what the credentials look like when integrated into Laravel code:
// .env file

MAIL_MAILER=smtp
MAIL_HOST=live.smtp.mailtrap.io
MAIL_PORT=2525
MAIL_USERNAME=//your username
MAIL_PASSWORD=// your password
MAIL_ENCRYPTION=tls
MAIL_FROM_ADDRESS=from@example.com
MAIL_FROM_NAME=//your app name
Mailtrap will let you verify your SMTP setup as soon as you run your Laravel app/project code that now contains the credentials and send a test email from it.
After sending the test email successfully, you should receive the “250 2.0.0 Ok: queued as …” response.
Then, just click on “Verify Setup” to start the verification process.

The next step is optional, but if you plan on monitoring your email performance, we highly recommend completing it.
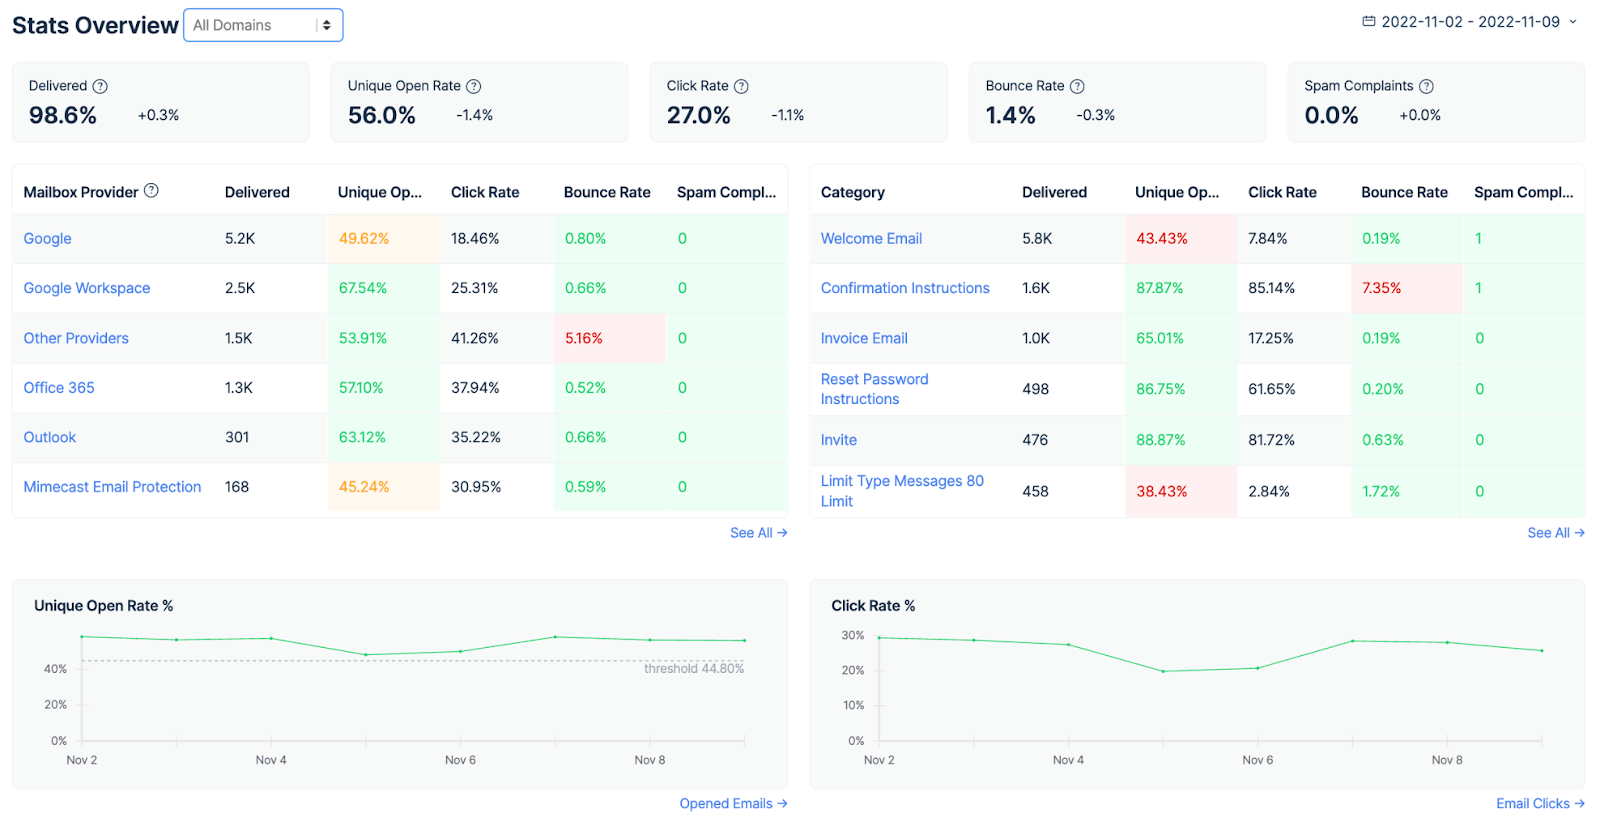
The step involves enabling Mailtrap tracking settings through which you can keep an eye on your email opens and clicks.

Once tracking is enabled, the stats collected will be shown in the Email Logs tab for each individual email.

In the Stats tab will be the aggregated data.
And with those steps done, you’ve set up Mailtrap as the SMTP server in your application!
If you prefer, you can also go with Gmail since it’s quite popular and has a simple setup as well that involves pasting SMTP credentials in your .env file like so:
MAIL_MAILER=smtp
MAIL_HOST=smtp.gmail.com
MAIL_PORT=465
MAIL_USERNAME=mygoogle@gmail.com
MAIL_PASSWORD=*************
MAIL_ENCRYPTION=tls
MAIL_FROM_ADDRESS=mygoogle@gmail.com
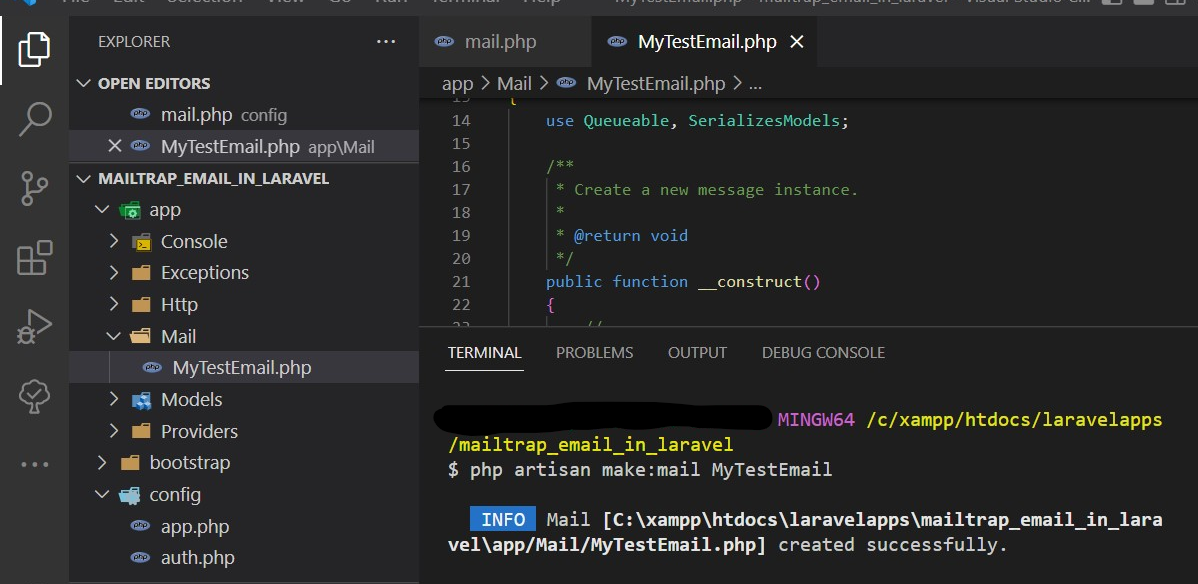
MAIL_FROM_NAME="${APP_NAME}"With SMTP setup out of the way, it’s time to create one of those mailable classes we mentioned earlier using the following command.
php artisan make:mail MyTestEmailAfter you run the command in the Artisan CLI, the MyTestEmail class will be created under app/Mail/MyTestEmail.php.
If you wish, you can inspect the class code below:
<?php

namespace App\Mail;

use Illuminate\Bus\Queueable;
use Illuminate\Contracts\Queue\ShouldQueue;
use Illuminate\Mail\Mailable;
use Illuminate\Mail\Mailables\Content;
use Illuminate\Mail\Mailables\Envelope;
use Illuminate\Queue\SerializesModels;

class MyTestEmail extends Mailable
{
    use Queueable, SerializesModels;

    /**
     * Create a new message instance.
     *
     * @return void
     */
    public function __construct()
    {
        //
    }

    /**
     * Get the message envelope.
     *
     * @return \Illuminate\Mail\Mailables\Envelope
     */

    public function envelope()
    {
        return new Envelope(
            subject: 'My Test Email',
        );
    }
 /**
     * Get the message content definition.
     *
     * @return \Illuminate\Mail\Mailables\Content
     */

    public function content()
    {
        return new Content(
            view: 'view.name',
        );
    }

    /**
     * Get the attachments for the message.
     *
     * @return array
     */
    public function attachments()
    {
        return [];
    }
}
As you can see, the content() method will return a view. That is why you now need to go to resources/views, create a new folder, and within it a blade.php file.
With the file created, you can now populate it with some text:
// resources/views/mail/test-email.blade.php
Hey,
Can your Laravel app send emails yet? ;)
Funny Coder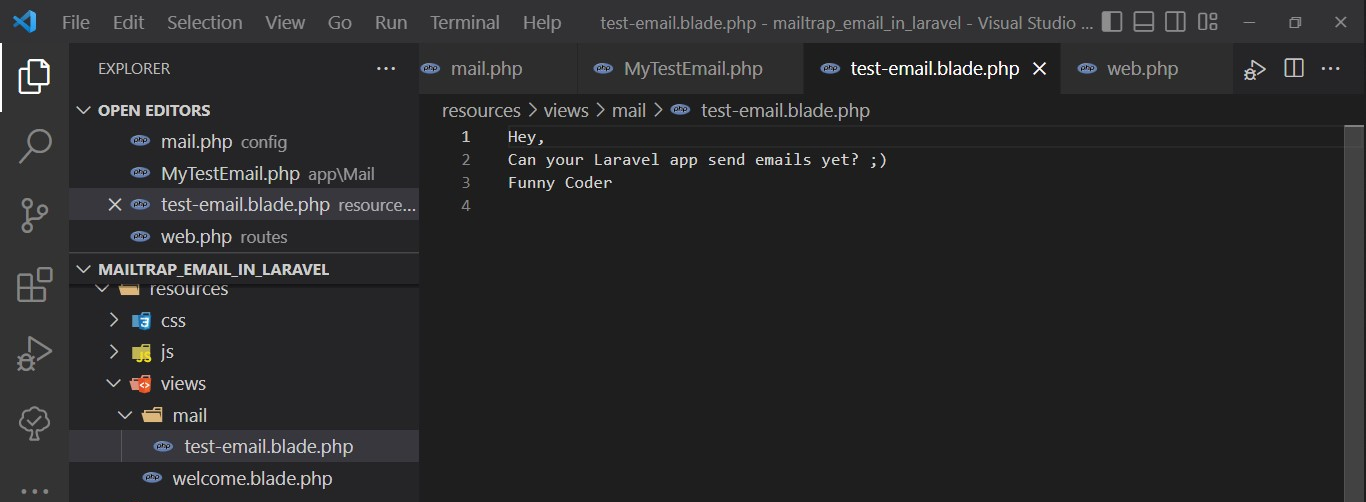
Go back to the content() method and replace the name of the view returned by it with the name of your newly-created one.
If you want to make things a bit more dynamic, you can make your email template/blade.php file include the recipient’s name by using the with attribute to pass the name.
<?php

namespace App\Mail;

use Illuminate\Bus\Queueable;
use Illuminate\Contracts\Queue\ShouldQueue;
use Illuminate\Mail\Mailable;
use Illuminate\Mail\Mailables\Content;
use Illuminate\Mail\Mailables\Envelope;
use Illuminate\Queue\SerializesModels;

class MyTestEmail extends Mailable
{
    use Queueable, SerializesModels;

    /**
     * Create a new message instance.
     *
     * @return void
     */
    public function __construct(private $name)
    {
        //
    }

    /**
     * Get the message envelope.
     *
     * @return \Illuminate\Mail\Mailables\Envelope
     */
    public function envelope()
    {
        return new Envelope(
            subject: 'My Test Email',
        );
    }

    /**
     * Get the message content definition.
     *
     * @return \Illuminate\Mail\Mailables\Content
     */
    public function content()
    {
        return new Content(
            view: 'mail.test-email',
            with: ['name' => $this->name],
        );
    }
}
Of course, to make this work, you now need to make a small change in the test-email.blade.php view file as well, allowing it to accept the $name variable.
// resources/views/mail/test-email.blade.php

Hey {{$name}},
Can your Laravel app send emails yet? ;)
Mailtrap
As the last step, we need to create a route in the routes/web.php file using the code below:
<?php

use Illuminate\Support\Facades\Route;
use App\Mail\MyTestEmail;
use Illuminate\Support\Facades\Mail;

Route::get('/testroute', function() {
    $name = "Funny Coder";

    // The email sending is done using the to method on the Mail facade
    Mail::to('testreceiver@gmail.com’')->send(new MyTestEmail($name));
});
To test things out, run the php artisan serve command and then go to your browser, where you need to paste the route you created. In our case, that is localhost:8000/testroute.
If everything went well, your email should end up in the inbox of the “to” address you specified.
How to send email in Laravel using a transactional email API?
Although sending emails using SMTP is completely fine, sending using an email API for some could be a better alternative as it automates the process. But this, of course, depends on the dev’s/project needs.
Mailtrap Email Sending, the sending solution we mentioned in the section above, besides SMTP, also offers an email API.
To integrate Mailtrap Email Sending’s email API into your Laravel application, you can now use the Mailtrap PHP SDK. This SDK makes integration easier and more efficient than manually writing the integration code for your project. Also, the Mailtrap library is fully compatible with Laravel 9.x and above
To get started, you will need to complete the following steps:
- Create a Mailtrap account and log in.
- Add and verify your domain.
- Install the Mailtrap PHP client and dependencies using Composer.
composer require railsware/mailtrap-php symfony/http-client nyholm/psr7- Add Mailtrap transport into your
config/mail.phpfile.
<?php

return [
    /*
    |--------------------------------------------------------------------------
    | Mailer Configurations
    |--------------------------------------------------------------------------
    */
    'mailers' => [

            // start mailtrap transport
            'mailtrap' => [
                'transport' => 'mailtrap'
            ],
            // end mailtrap transport

    ]
];- Add your Mailtrap credentials to your Laravel
.envfile.
MAIL_MAILER="mailtrap"
MAILTRAP_HOST="send.api.mailtrap.io"
MAILTRAP_API_KEY="YOUR_API_KEY_HERE"
MAILTRAP_INBOX_ID=1000001- Create a mailable class to send email.
php artisan make:mail WelcomeMail- Configure the
app/Mail/WelcomeMail.phpclass following this example.
<?php

namespace App\Mail;

use Illuminate\Bus\Queueable;
use Illuminate\Mail\Attachment;
use Illuminate\Mail\Mailable;
use Illuminate\Mail\Mailables\Address;
use Illuminate\Mail\Mailables\Content;
use Illuminate\Mail\Mailables\Envelope;
use Illuminate\Mail\Mailables\Headers;
use Illuminate\Queue\SerializesModels;
use Mailtrap\EmailHeader\CategoryHeader;
use Mailtrap\EmailHeader\CustomVariableHeader;
use Symfony\Component\Mime\Email;
use Symfony\Component\Mime\Header\UnstructuredHeader;

class WelcomeMail extends Mailable
{
    use Queueable, SerializesModels;

    private string $name;

    /**
     * Create a new message instance.
     */
    public function __construct(string $name)
    {
        $this->name = $name;
    }

    /**
     * Get the message envelope.
     */
    public function envelope(): Envelope
    {
        return new Envelope(
            from: new Address('jeffrey@example.com', 'Jeffrey Way'),
            replyTo: [
                      new Address('taylor@example.com', 'Taylor Otwell'),
                  ],
            subject: 'Welcome Mail',
            using: [
                      function (Email $email) {
                          // Headers
                          $email->getHeaders()
                              ->addTextHeader('X-Message-Source', 'example.com')
                              ->add(new UnstructuredHeader('X-Mailer', 'Mailtrap PHP Client'))
                          ;

                          // Custom Variables
                          $email->getHeaders()
                              ->add(new CustomVariableHeader('user_id', '45982'))
                              ->add(new CustomVariableHeader('batch_id', 'PSJ-12'))
                          ;

                          // Category (should be only one)
                          $email->getHeaders()
                              ->add(new CategoryHeader('Integration Test'))
                          ;
                      },
                  ]
        );
    }

    /**
     * Get the message content definition.
     */
    public function content(): Content
    {
        return new Content(
            view: 'mail.welcome-email',
            with: ['name' => $this->name],
        );
    }

    /**
     * Get the attachments for the message.
     *
     * @return array<int, \Illuminate\Mail\Mailables\Attachment>
     */
    public function attachments(): array
    {
        return [
           Attachment::fromPath('https://mailtrap.io/wp-content/uploads/2021/04/mailtrap-new-logo.svg')
                ->as('logo.svg')
                ->withMime('image/svg+xml'),
        ];
    }

    /**
     * Get the message headers.
     */
    public function headers(): Headers
    {
        return new Headers(
            'custom-message-id@example.com',
            ['previous-message@example.com'],
            [
                'X-Custom-Header' => 'Custom Value',
            ],
        );
    }
}- Create an email template under
resources/views/mail/welcome-email.blade.php.
Hey, {{$name}} and welcome here 😉

<br>
Funny Coder- Add the CLI router to the
app/routes/console.php file.
<?php

use App\Mail\WelcomeMail;
use Illuminate\Support\Facades\Artisan;
use Illuminate\Support\Facades\Mail;

/*
|--------------------------------------------------------------------------
| Console Routes
|--------------------------------------------------------------------------
|
*/

Artisan::command('send-welcome-mail', function () {
    Mail::to('testreceiver@gmail.com')->send(new WelcomeMail("Jon"));
    // Also, you can use specific mailer if your default mailer is not "mailtrap" but you want to use it for welcome mails
    // Mail::mailer('mailtrap')->to('testreceiver@gmail.com')->send(new WelcomeMail("Jon"));
})->purpose('Send welcome mail');- Call the CLI command to send your email.
php artisan send-welcome-mail- Verify your setup – After completing all the steps and getting no errors, you should be all set to use Mailtrap Email Sending’s email API for sending transactional emails.
When using Mailtrap Email Sending’s email API instead of its SMTP, you can still enable the tracking settings we mentioned earlier. Also, regardless of whether you are using the email API or SMTP, Mailtrap allows you to turn on deliverability alerts and webhooks, and here is how.
For deliverability alerts, go into your Mailtrap account, and under Email Sending → Deliverability Alerts, turn on Health Status Weekly and/or Critical Alerts.

Health Status Weekly will arrive on Mondays and give a detailed preview of opened emails, clicks, bounces, unsubscribes, and spam.
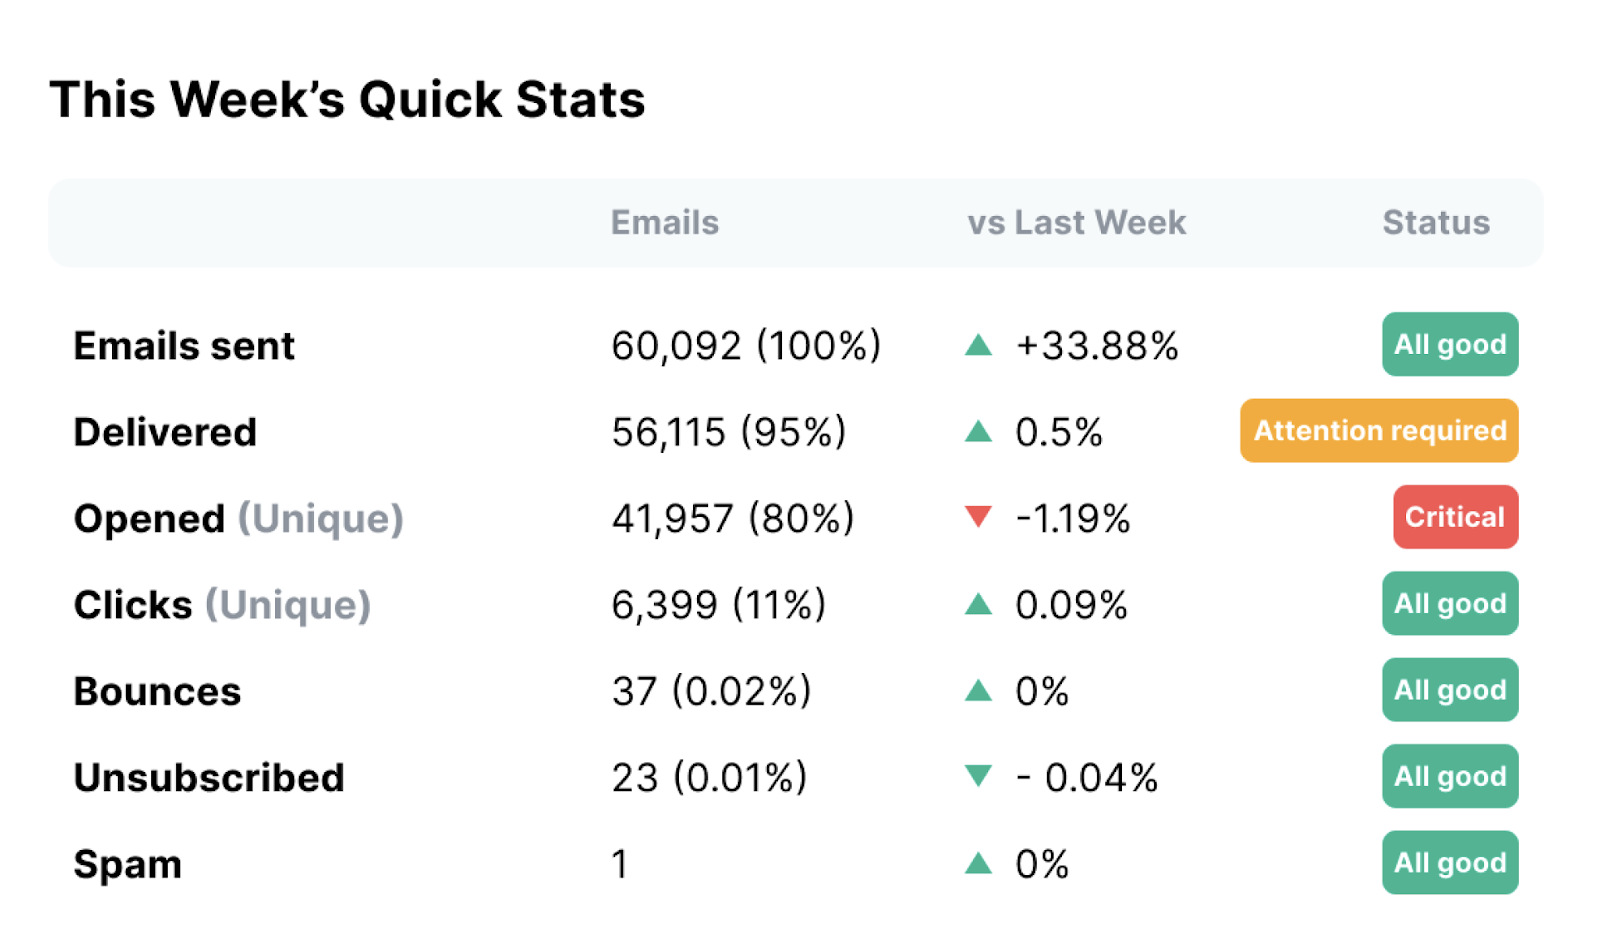
While Critical Alerts will be sent when a critical metric of yours goes below a predetermined threshold (our system checks your metrics every three hours for the past 24 hours).
Webhooks will provide you with information about your deliverability in almost real-time and can be enabled under Email Sending → Sending Domains → Webhooks after completing a few steps:
- Click the “Add New Webhook” button.
- Put in a valid URL.
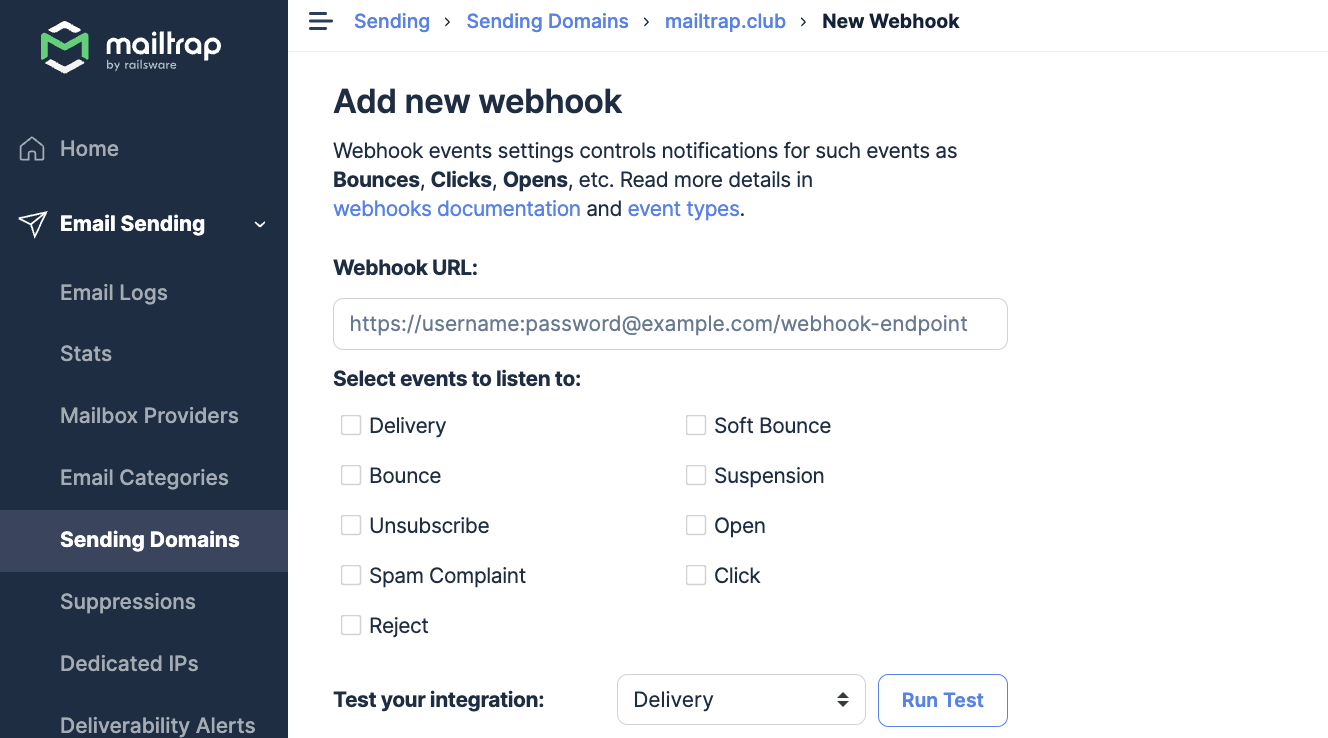
- Select one or more event types.
- Test the webhook.
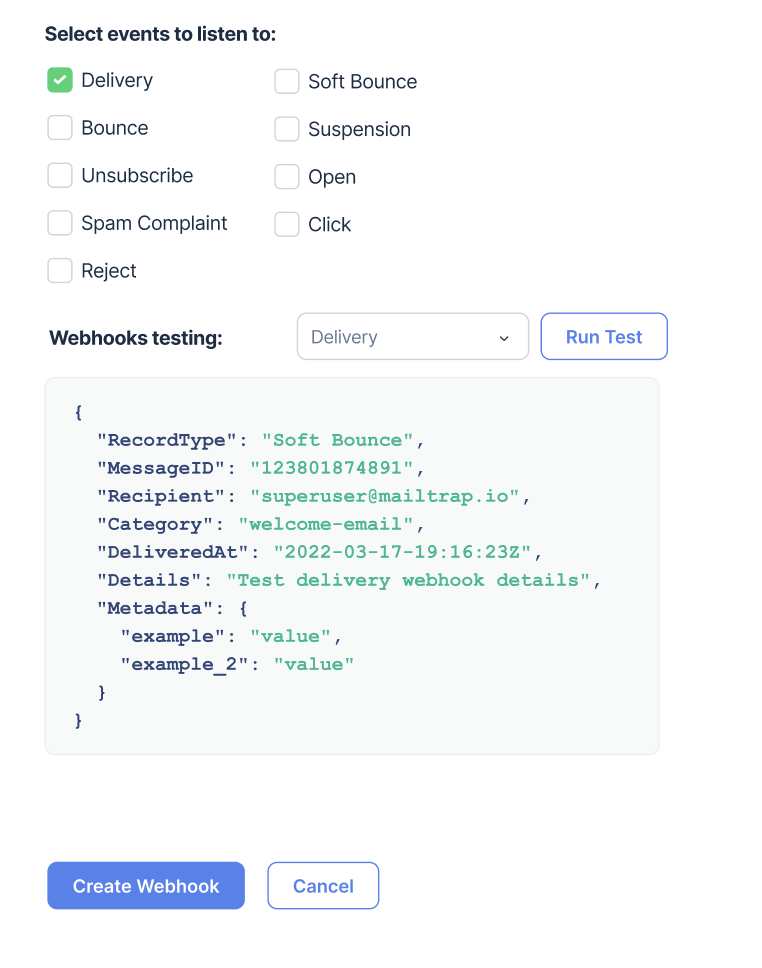
- Click the “Create Webhook” button.
All the above steps are described in detail on the webhooks page of the Mailtrap knowledgebase.
Other features of Mailtrap Email Sending include suppression lists, dedicated IPs, as well as IP auto warm-up, and you can learn more about them through the dedicated Mailtrap knowledgebase pages or the video below, as we won’t be covering them in this tutorial.
How to send HTML email in Laravel?
Earlier, we covered sending plain text emails, but as most of you will be looking to send HTML ones that are far more eye-catching and engaging, we’ll now go over the process of turning plain text into HTML.
In Laravel, this process is pretty simple, and basically, all it entails is adding HTML code to your Blade view file, which in the case of this tutorial is test-email.blade.php.
This is what our plain text email looks like in HTML form:
<!doctype html>
<html lang="en">
<head>
    <meta charset="UTF-8">
    <meta name="viewport"
          content="width=device-width, user-scalable=no, initial-scale=1.0, maximum-scale=1.0, minimum-scale=1.0">
    <meta http-equiv="X-UA-Compatible" content="ie=edge">

    <style>
        p {
            font-size: 12px;
        }

        .signature {
            font-style: italic;
        }
    </style>
</head>
<body>
<div>
    <p>Hey {{ $name }},</p>
    <p>Can your Laravel app send emails yet? ;) </p>
    <p class="signature">Mailtrap</p>
</div>
</body>
</html>
How to send email with attachments in Laravel?
Laravel, of course, allows you to add attachments to your emails. To make that happen, in the example code for sending email we used earlier, we will need to modify the attachments method.
We start off with making them in the MyTestEmail class:
<?php

namespace App\Mail;

use Illuminate\Bus\Queueable;
use Illuminate\Mail\Mailable;
use Illuminate\Mail\Mailables\Content;
use Illuminate\Queue\SerializesModels;
use Illuminate\Mail\Mailables\Envelope;
use Illuminate\Mail\Mailables\Attachment;
use Illuminate\Contracts\Queue\ShouldQueue;

class MyTestEmail extends Mailable
{
    use Queueable, SerializesModels;

    /**
     * Create a new message instance.
     *
     * @return void
     */
    public function __construct(private $name, public $attachedFile){ }

    /**
     * Get the message envelope.
     *
     * @return \Illuminate\Mail\Mailables\Envelope
     */
    public function envelope()
    {
        return new Envelope(
            subject: 'My Test Email',
        );
    }

    /**
     * Get the message content definition.
     *
     * @return \Illuminate\Mail\Mailables\Content
     */
    public function content()
    {
        return new Content(
            view: 'mail.test-email',
            with: ['name' => $this->name],
        );
    }

    /**
     * Get the attachments for the message.
     *
     * @return array
     */
    public function attachments()
    {
        return [
            Attachment::fromPath($this->attachedFile),
        ];

    }
}
Then, we make tweaks in the testroute code under routes/web.php:
<?php

use Illuminate\Support\Facades\Route;
use App\Mail\MyTestEmail;

Route::get('/testroute', function () {

    $filePath = public_path('favicon.ico');

    $name = "Funny Coder";

    Mail::to('testreceiver@gmail.com’')->send(new MyTestEmail($name, $filePath));
});
And that is it! Our email now comes with an ICO attachment named favicon.ico, as evident in the code above.
How to send emails to multiple recipients in Laravel?
Sending an email to multiple recipients is a quite frequent requirement, and according to Laravel’s documentation, it can be done as follows:
foreach (['First Coder' => 'first-recipient@gmail.com', 'Second Coder' => 'second-recipient@gmail.com'] as $name => $recipient) {
    Mail::to($recipient)->send(new MyTestEmail($name));
}
Essentially, what the code above does is iterate over an array of recipients. And, to prevent the sending of another email to every previous recipient at every iteration through the loop, it also re-creates the mailable instance each time.
If you want to send your email to just one recipient but also “cc” and “bcc” a few more, you can do it by following this example in the MyTestEmail class:
return new Envelope(
    subject: 'My Test Email',
    cc: ['testreceiver-cc@gmail.com'],
    bcc: ['testreceiver-bcc@gmail.com']
);
How to test emails in Laravel?
Testing emails is one of the crucial pre-sending steps you need to complete. If you don’t, you risk having your emails sent from a blacklisted domain, marked as spam, and/or their HTML template code poorly rendered by web browsers without you even knowing it.
And while nothing is stopping you from testing using your personal inbox, opting for email testing solutions is the way to go as it’s faster, doesn’t affect your domain reputation, doesn’t fill up your inbox with junk, and comes with a range of other benefits.
A solution that can solve a number of email testing challenges while maintaining the email testing process secure is Mailtrap Email Testing, also part of the Mailtrap Email Delivery Platform.
With Mailtrap Email Testing, you can catch testing emails from staging and dev environments and then preview them, check their content spam score, and analyze their HTML/CSS, all before sending them to recipients.
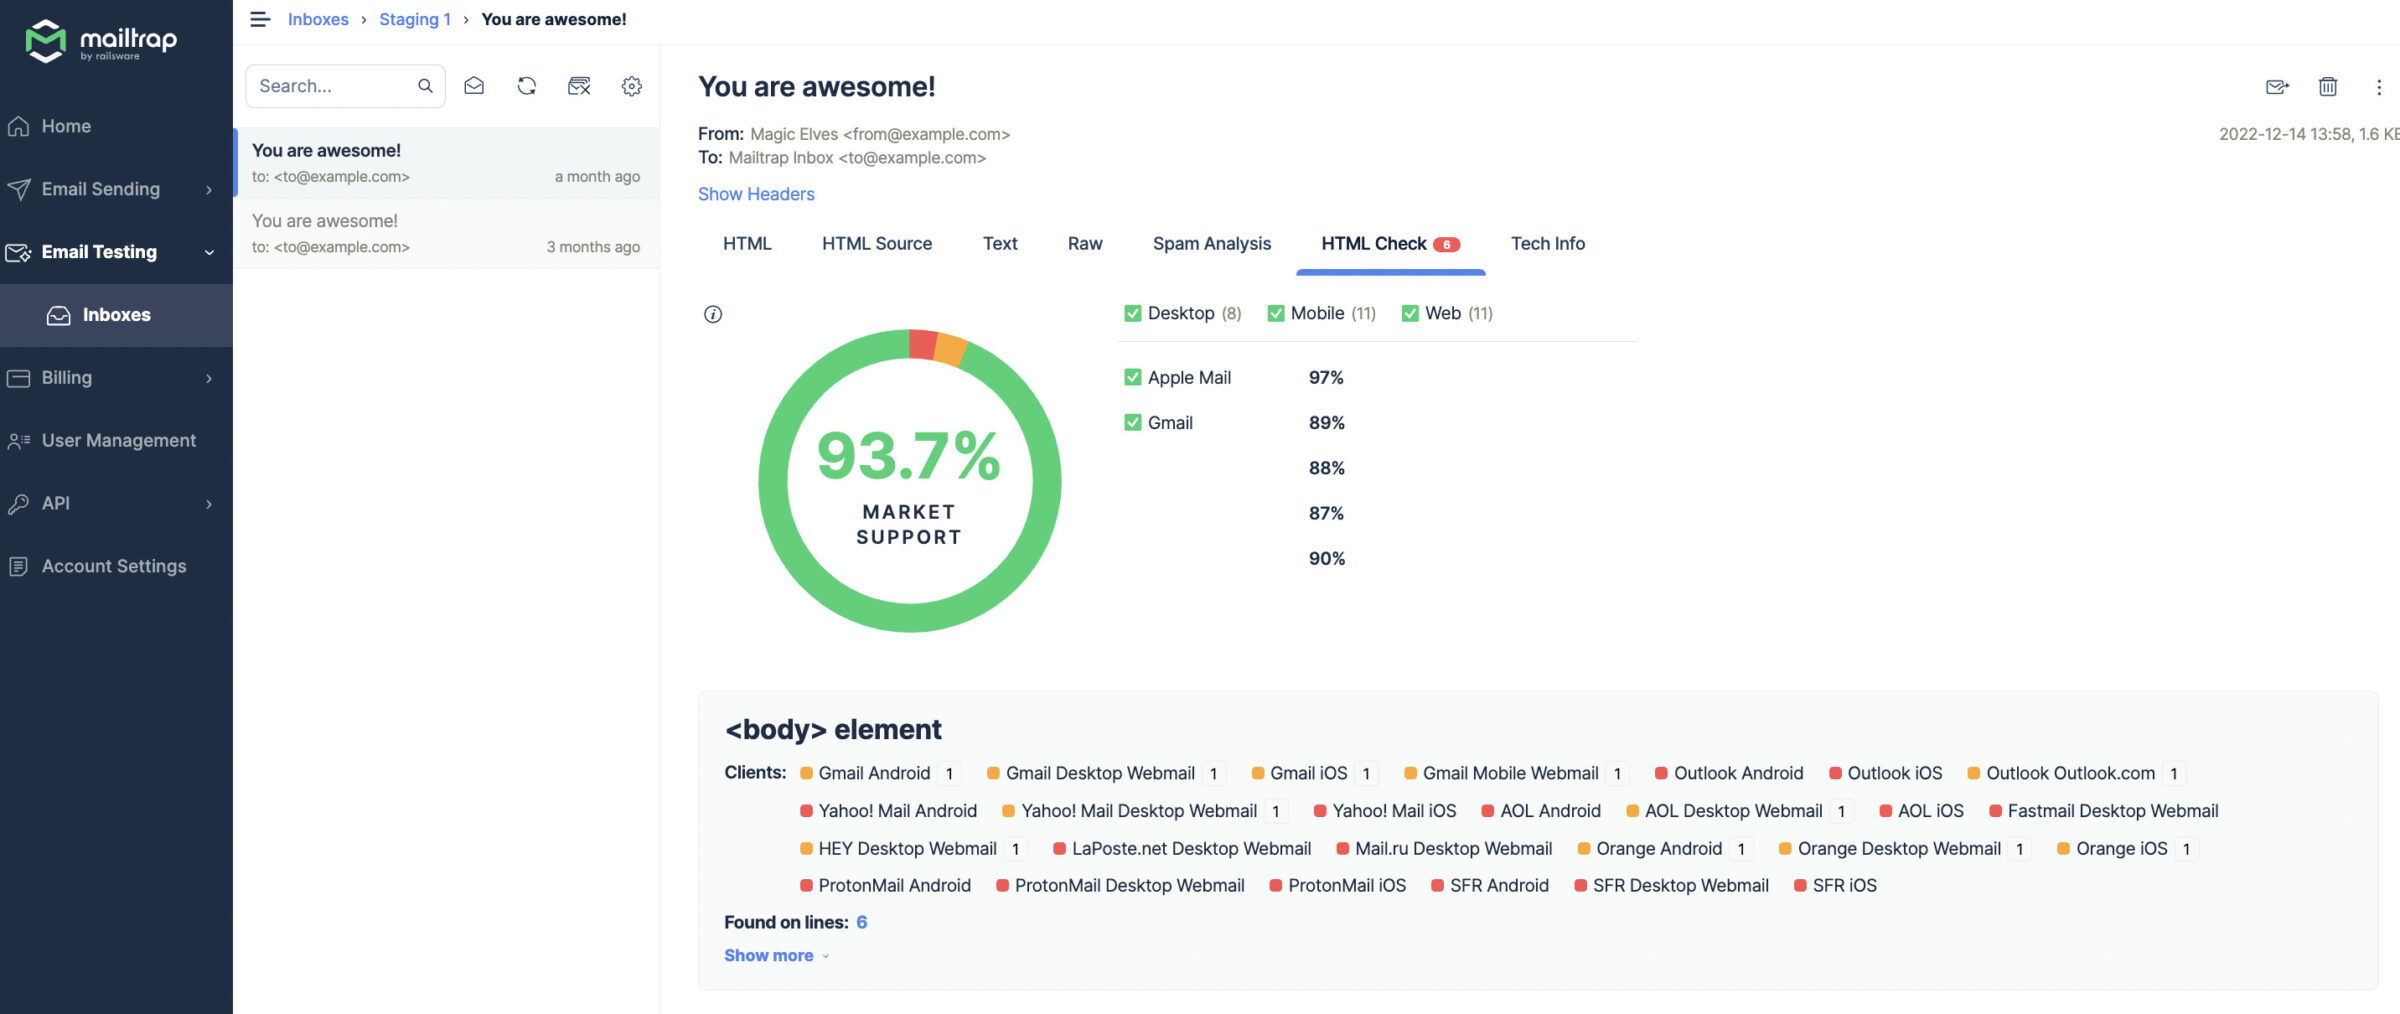
And for devs/QAs who want to keep things more organized, Email Testing allows creating multiple inboxes for different projects and stages of projects.
The testing solution will also provide you with insight into SMTP transaction info, as well as the original values of email headers and the option to forward your testing emails to whitelisted recipients manually or automatically.
Setting up Email Testing and sending your first test email will take just a five-minute process that consists of the following steps:
- Create a Mailtrap account and log in.
- In your account, navigate to Email Testing → Inboxes → SMTP Settings.
- Select Laravel from the list of integrations.
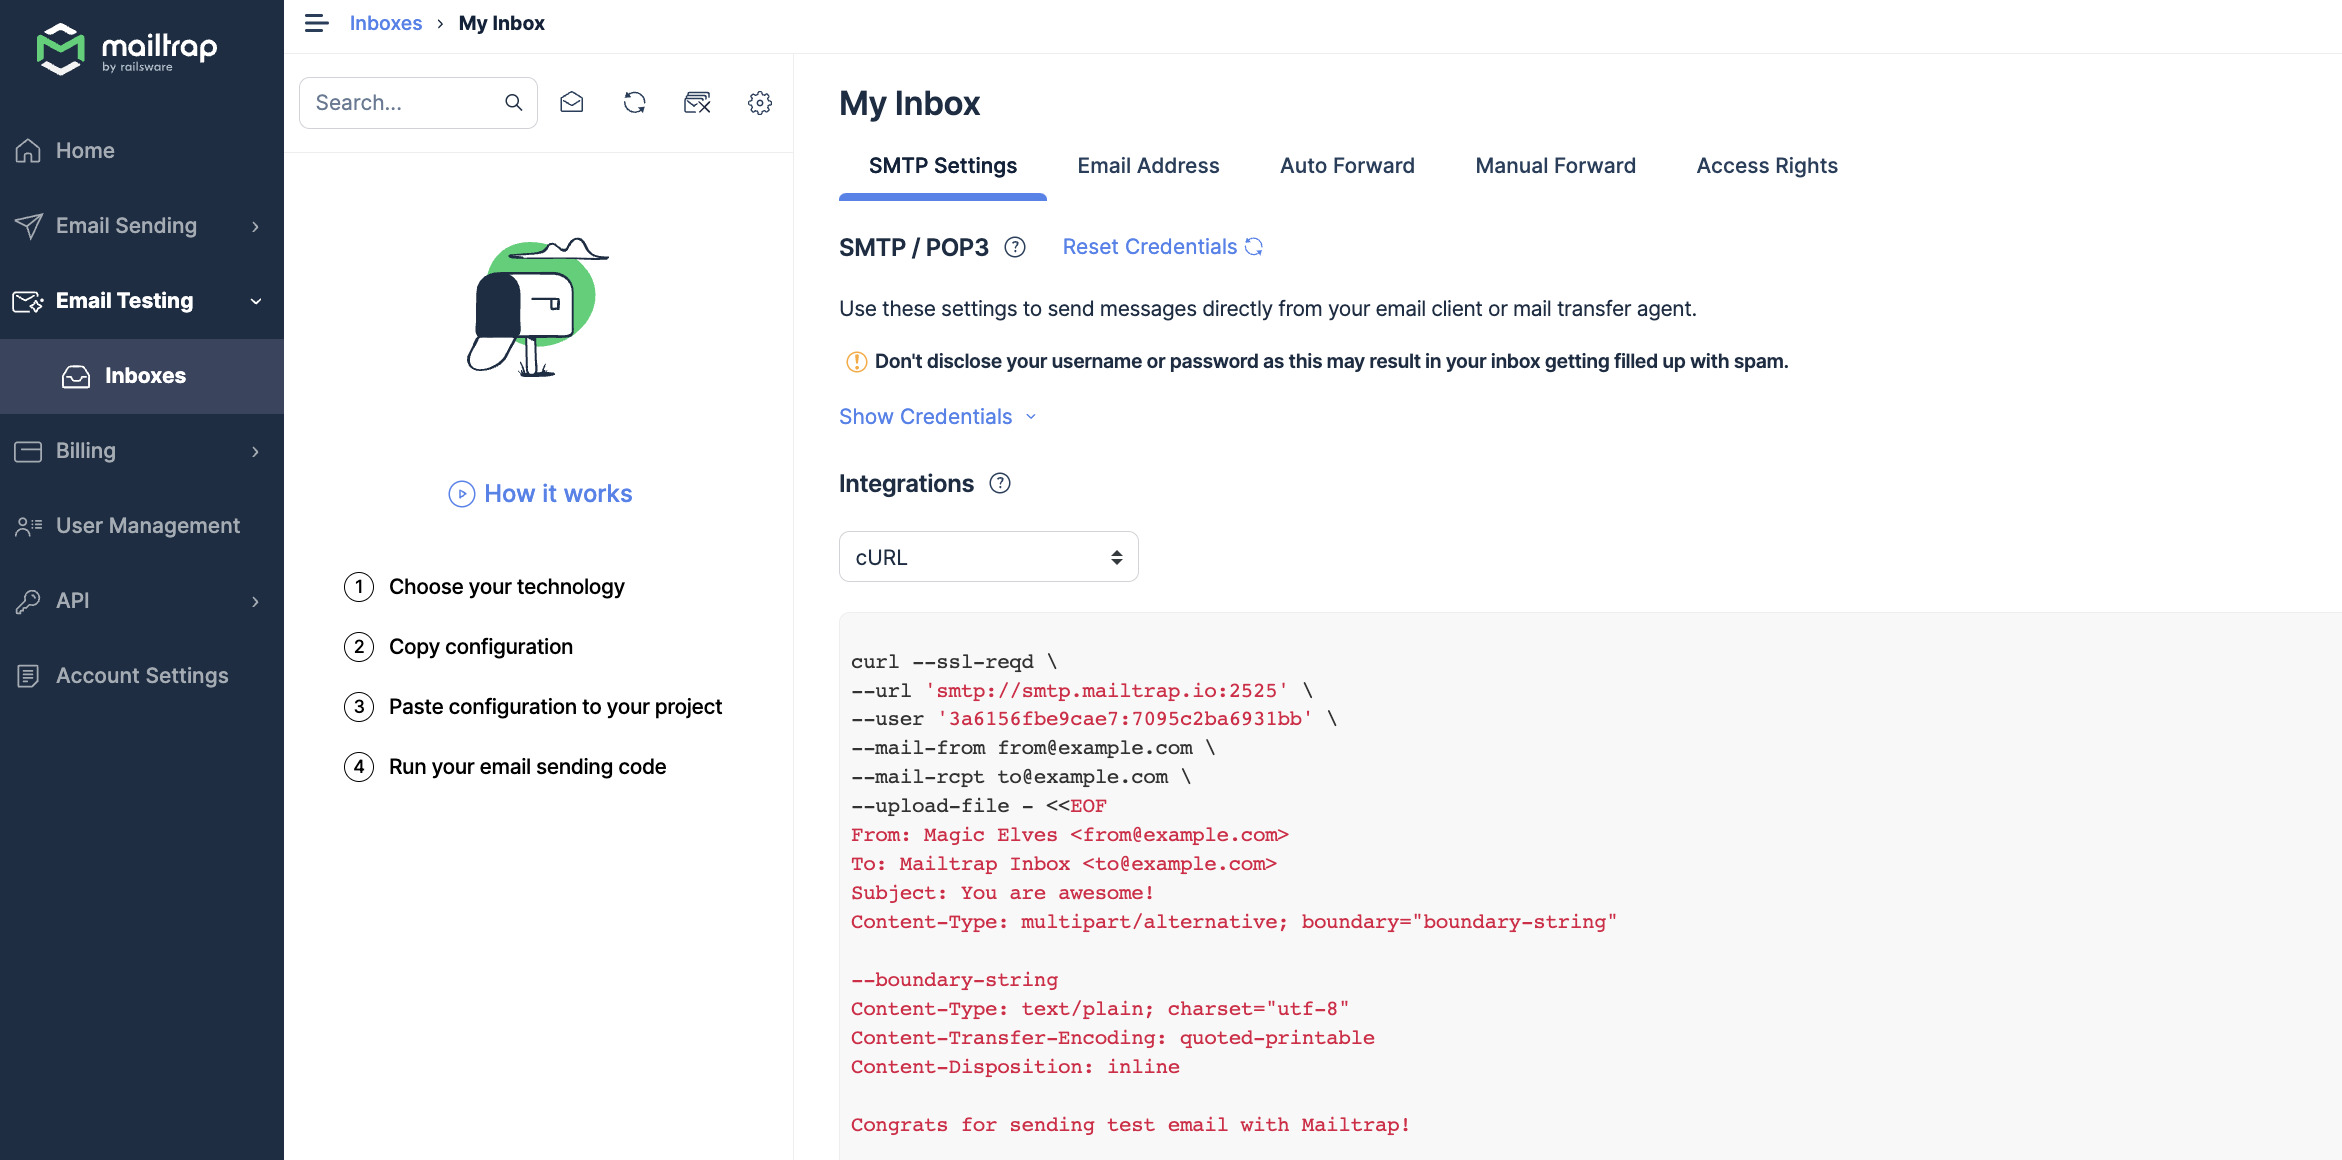
- Copy the code snippet generated and paste it into your email-sending script.
- Run the script, and get the test email in your Email Testing virtual inbox shortly.
- Start the Laravel email testing process!
For each of your virtual inboxes, Email Testing provides SMTP credentials which you can find by clicking “Show Credentials” on the SMTP Settings page. So, if you prefer using Mailtrap SMTP server credentials over code snippets, simply copy and paste them into your email-sending script, MTA settings, email client settings, or a different system that supports them. This is an alternative way to start using the testing solution.
Wrapping things up
In this article, we covered a lot in terms of PHP Laravel and using it to send emails – from the Laravel mail function example to HTML emails and emails with multiple recipients. But that is only scratching the surface of what this PHP framework can do. To learn more, check out the official Laravel documentation.
If, on the other hand, you are looking for more content about emails like this send email with Laravel tutorial, then make sure to further explore the Mailtrap blog!
Recommended Laravel content:

Comments
4 replies